Reversing a Router for the First Time
After having the privilege of working on two protocol reverse engineering projects earlier in the year, I wanted to continue practicing. I enjoyed the experience thoroughly—it was fun and rewarding.
Admittedly I felt inspired by LowLevel’s Temu Router1 YouTube video when it came out, although I knew that unless I picked some cheap device like that, it wouldn’t be as easy. Even on a name-brand router I expected firmware extraction and hardware access to be a slog. After searching around for a bit, I decided to buy a D-Link AX-15002 for no apparent reason other than the fact it looked visually interesting and the AI buzzwords intrigued me.
The goal of the research: dump the firmware, reverse engineer parts of the application, and find a way to pwn the device.
Disclaimer: Rather than focusing on vulnerabilities, exploits, and pwnage, this post is mainly about explaining my methodology, where I looked, and what’s next. This is something I do in my free time, which is close to none more often than not. This is purely for educational purposes, and any serious vulnerabilities identified in this device were communicated to D-Link before publishing (and anything published here was with their consent). This may turn into a series of posts as I continue to explore this device specifically.
Dumping the firmware: Fingerprinting the Device
Once the thingy arrived, I plugged it into the power outlet and tried to connect my computer to it via the Wi-Fi interface using the default SSID printed on the bottom of the device. Once connected, you can access your typical router admin panel on 192.168.0.1. Since this was my first time setting it up, it was password protected and therefore there wasn’t much to be done here—for legitimate owners you get the admin password in the manual they ship with the device.
But I wanted to find my way around this, despite the low odds of success. D-Link is not that terrible :)
The first thing I ran after initially connecting to the device was a full TCP scan against the router’s subnet (a lazy
/16 sweep from the connected network), to see which services we can identify running on the device by default:
1» nmap -sN -p- 192.168.0.0/16
The results were essentially three ports running on 192.168.0.1 (expected):
53/tcp— likely internal DNS80/tcp— HTTP admin portal44871/tcp— Universal Plug and Play port based on the banner retrieved by nmap- I don’t know a lot about this protocol specifically, but there seem to be several security considerations worth looking into3.
After continuing fingerprinting and examining the client-side code served by the admin panel, I concluded there wasn’t really a lot I could do around here. Next, I decided to complete the first-time setup and use the provided password in the manual. Later, if I find anything worth investigating, I can reset the router and try whatever as if it was new.
Once in, the thing that I focused on was the XHR requests the interface was doing when visiting /. My expectation was
to see a request to potentially juicy endpoints like /config or /auth.
However, I ended up discovering one specific endpoint /DHMAPI that is used to configure and query the device. Under the hood,
DHMAPI wraps SOAP actions—the API-ACTION header names the operation. These requests also include special headers like
API-AUTH and API-CONTENT. Another detail that caught my attention was that this root request essentially returned
all supported operations in this endpoint:
Extracting the HAR file from the browser, I asked an LLM to skim through all those requests and essentially map out the entire API, the methods, and what could or could not be retrieved. It built a fairly trivial Python script that wrapped the credentials and got me a map of this API pretty quickly (If you are interested, I was using Pickle for this task).
Observed Get Operations (initial flow)
| SOAP Body | Band | Data Returned |
|---|---|---|
GetDeviceSettings | — | Device info, firmware version, lists available SOAP actions |
GetNetworkSettings | — | LAN IP, subnet, DHCP range |
GetWanSettings | — | WAN connection type (DHCP), DNS, NAT |
GetWLanRadioSettings | 2.4 GHz | Radio config |
GetWLanRadioSecurity | 2.4 GHz | Security (WPA2-PSK, encrypted key) |
GetWLanRadioSettings | 5 GHz | Radio config |
GetWLanRadioSecurity | 5 GHz | Security (WPA2-PSK, encrypted key) |
GetWLanRadios | — | Radio capabilities, channels, supported modes |
GetSmartconnectSettings | — | SmartConnect status |
GetOperationMode | — | Operation mode (WirelessRouter) |
While the setters looked way more interesting for the purpose of this research, I skipped them altogether after realizing these endpoints are (obviously) protected behind a auth wall. I couldn’t bypass it for now. Each session generates a new session token, and I haven’t got the point that I fully understand how this mechanism works. So, sure, I could change its settings — but I was logged in as admin and therefore this pursuit wasn’t making a lot of sense.
For the sake of the research and this post, here are the available Set operations through this DHMAPI API.
Available Set Operations (require admin auth)
| SOAP Operation | Category | Impact |
|---|---|---|
SetFactoryDefault | System | Factory reset the router |
SetAdministrationSettings | System | Change admin password/credentials |
SetWLanRadioSecurity | Wireless | Change Wi-Fi passphrase/encryption |
SetWLanRadioSettings | Wireless | Disable radio, change SSID/channel |
SetNetworkSettings | Network | Change LAN IP, DNS relay (MITM potential) |
SetFirewallSettings | Security | Disable firewall |
SetIPv4FirewallSettings | Security | Disable IPv4 firewall rules |
SetDMZSettings | Network | Expose internal host to WAN |
SetPortForwardingSettings | Network | Open ports from WAN to LAN |
SetVirtualServerSettings | Network | Expose internal services |
SetWanSettings | Network | Change WAN type, DNS, MAC clone |
SetQuickVPNSettings | Network | Configure VPN access |
SetParentalControlv2ProfileInternetPause | Control | Disable internet for specific users |
SetScheduleSettings | Control | Disable scheduled restrictions |
Reboot | System | Denial of service |
FirmwareUpload | System | Upload malicious firmware |
ConfigFileUpload | System | Upload modified config (potential RCE) |
SetTriggerPPPoEValidate | Network | Potentially harvest WAN credentials |
SetGuestZoneRouterSettings | Wireless | Modify guest network isolation |
SetMeshSettings | Wireless | Modify mesh node configuration |
The only two relevant findings at this point was the Wi-Fi keys (GetDeviceSettings) which I retrieved from the config XML body.
Most of the content of that response is useless; I’m not sure what I can do with these two (I have the keys for IPv4 and
IPv6), but I stored them in my notes. The other one was the firmware version the device is running:
Model: R15, Hardware: A1, Firmware: 1.20.01 (it’s going to be useful later).
Dumping the firmware: We’ll do UART instead (or maybe not)
While you can upload firmware to install and upgrade, there is no way to download the firmware the router is running from the admin interface or these APIs I found. So I gave up on that route and decided to try UART instead. And for that, I leaned heavily on this mighty video from the Flashback Team to guide me through it4.
I tore the thing apart, looked for the three pins, checked which ones had constant and oscillating current, and tried my luck.
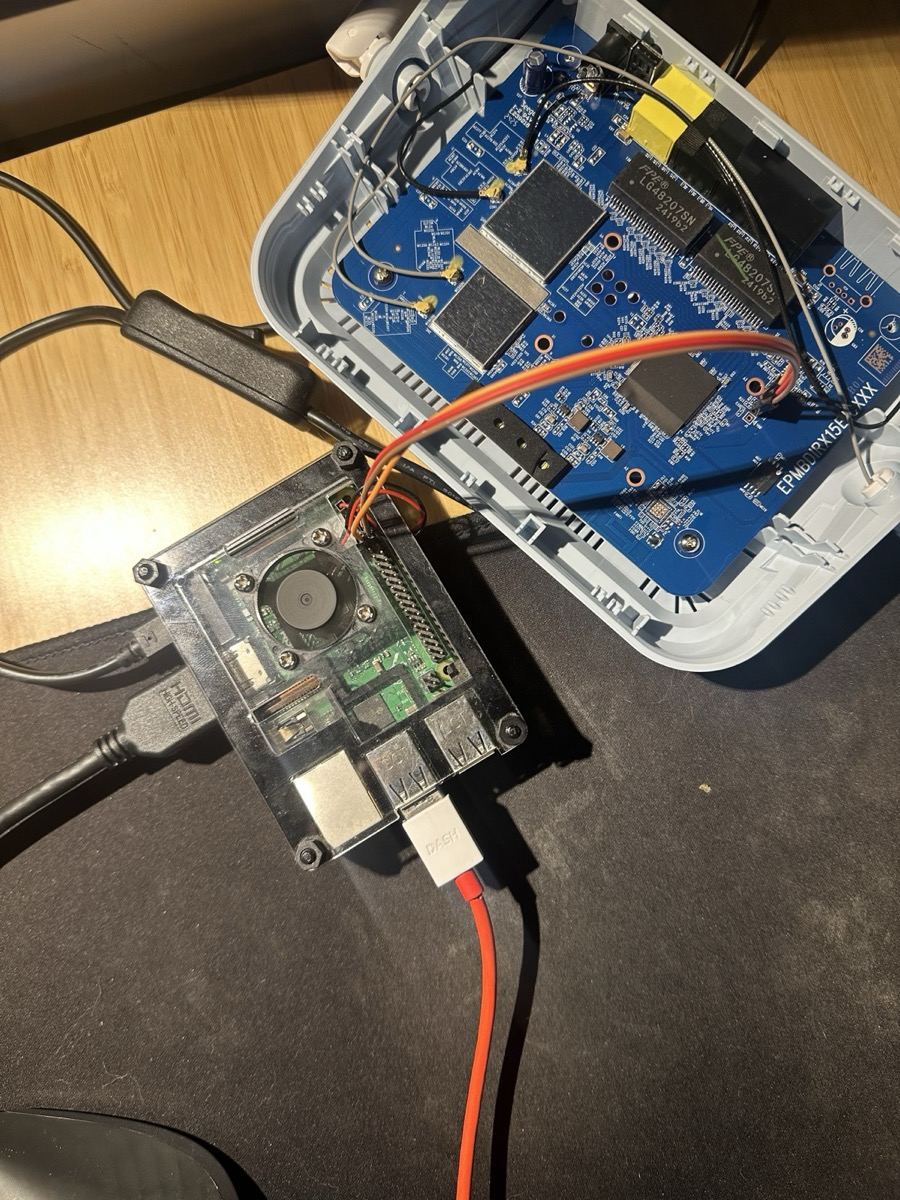
Note: Don’t be afraid to spend some money on proper hardware for these things. I was being lazy about buying proper gear. People recommended a HydraBus5 and a Focaccia Board6 to me. The first one seems to be unavailable or extremely expensive in the few places that have it.
But, I paid the bill for being lazy. I decided to try my Raspberry Pi’s breadboard to plug in the UART.
I spent days solving issues related to noise in the U-boot console. It made it totally useless. Eventually also realized that when you enable the UART console in the Raspberry Pi, it also enables serial debugging. Once I disabled this option, I started seeing a lot less noise when connected. Occasionally, I still have to blow the pins to make sure there’s no cat fur, dust or whatever causing noise. Pretty sure this is related to use a Raspberry pi instead of proper gear.
Once UART was set and working, I connected to it using screen /dev/serial0 115200. I tried a few baud rates
first, including the default 9600, but after a few iterations I realized it was 115200. Once this was sorted,
reinitializing the router by hand and waiting to see what happens was all I needed. On load, the first relevant information
is that this device is running Busybox v1.23.2, which we can search for known CVEs later. If we don’t press any key,
the device proceeds to normal boot. Sometime in the middle of it, we get a message to press any key to enter u-boot.
Once inside this “shell”, I started my recon. The help command and its output were useful for deciding the
next steps, as we realized what was or was not available for us to work with.
 19607C/9603C# help
 2?               - alias for 'help'
 3base            - print or set address offset
 4bdinfo          - print Board Info structure
 5boot            - boot default, i.e., run 'bootcmd'
 6bootd           - boot default, i.e., run 'bootcmd'
 7bootm           - boot application image from memory
 8bootp           - boot image via network using BOOTP/TFTP protocol
 9btg             - bus traffic generator sub-system
10ccsid           - load c csid and RW
11chpart          - change active partition
12cmp             - memory compare
13coninfo         - print console devices and information
14cp              - memory copy
15crc32           - checksum calculation
16echo            - echo args to console
17editenv         - edit environment variable
18env             - environment handling commands
19exit            - exit script
20false           - do nothing, unsuccessfully
21go              - start application at address 'addr'
22help            - print command description/usage
23httpd           - start httpd
24iminfo          - print header information for application image
25imxtract        - extract a part of a multi-image
26itest           - return true/false on integer compare
27loadb           - load binary file over serial line (kermit mode)
28loads           - load S-Record file over serial line
29loady           - load binary file over serial line (ymodem mode)
30loop            - infinite loop on address range
31md              - memory display
32mdram_test      - mdram_test   - do DRAM test.
33mm              - memory modify (auto-incrementing address)
34msnaf_test      - msnaf_test  - do spi-nand flash test.
35mtdparts        - define flash/nand partitions
36mtest           - simple RAM read/write test
37mw              - memory write (fill)
38nand_badblock   - test/set block health status
39nm              - memory modify (constant address)
40pcsid           - load p csid and R
41printenv        - print environment variables
42reset           - Perform RESET of the CPU
43reset_all       - Perform whole chip RESET of the CPU
44reset_sw        - Perform software RESET
45run             - run commands in an environment variable
46saveenv         - save environment variables to persistent storage
47setenv          - set environment variables
48showvar         - print local hushshell variables
49sleep           - delay execution for some time
50source          - run script from memory
51spi_nand        - SPI-NAND sub-system
52test            - minimal test like /bin/sh
53tftp            - boot image via network using TFTP protocol
54tftpboot        - boot image via network using TFTP protocol
55tftpput         - TFTP put command, for uploading files to a server
56tftpsrv         - act as a TFTP server and boot the first received file
57true            - do nothing, successfully
58ubi             - ubi commands
59upimgtar        - update kernel and rootfs by tar format on luna platform
60upvmimg         - update kernel and rootfs by vmimg format on luna platform
61version         - print monitor, compiler and linker version
A reminder that my goal at this point was to dump the firmware. Nothing available in u-boot
seemed to help there, so I started exploring other options; one that came to mind was to get a shell on the device at
boot and figure out a way to dump the firmware from there, or at least extract relevant binaries—like the HTTP server it is
running or any of its other background services.
After inspecting its env, we can see a bunch of useful flags to control the boot sequence and its commands (shortened
for brevity):
9607C/9603C# printenv

baudrate=115200 --- confirmed it's 115200!!
boot_by_commit=if itest.s ${sw_commit} == 0;then run set_act0;run ub0;else run set_act1;run ub1;fi
boot_by_tryactive=if itest.s ${sw_tryactive} == 0;then setenv sw_tryactive 2;setenv sw_active 0;saveenv;run en_wdt;run ub0;else setenv sw_tryactive 2;setenv sw_active 1;saveenv;run en_wdt;run ub1;fi
bootargs_base=console=ttyS0,115200
bootcmd=if itest.s ${sw_tryactive} == 2; then run boot_by_commit;else run boot_by_tryactive;fi
bootdelay=1
bootargs_base is a variable that is used by another command to set its boot arguments. boot_by_commit and boot_by_tryactive
both invoke ub[0|1], which is essentially this:
ub0=set root_mtd 31:9 && run process0 setmoreargs setbootargs; bootm ${freeAddr};run ub021;httpd
ub021=set root_mtd 31:11 && run process1 setmoreargs setbootargs; bootm ${freeAddr}
ub1=set root_mtd 31:11 && run process1 setmoreargs setbootargs; bootm ${freeAddr}; run ub120; httpd
ub120=set root_mtd 31:9 && run process0 setmoreargs setbootargs; bootm ${freeAddr};

setbootargs=setenv bootargs ${bootargs_base} ${more_args} ${mtdparts}
setmoreargs=set more_args ubi.mtd=${ubi_mtd} root=${root_mtd} rootfs=squashfs
So I got interested in that bootargs_base. Unfortunately, all my attempts to add an init=/bin/sh param to this failed
due to a kernel-level protection that prevents any shell from starting correctly. Any iteration you can think of, I tried:
set bootargs_base=console=ttyS0,115200 init=/bin/sh, or busybox, or bash, or /bin/[sh|busybox] -c… Nothing worked.
I always landed here:
1
2 BusyBox v1.23.2 (2024-04-17 11:26:38 CST) built-in shell (ash)
3
4/bin/sh: can't access tty; job control turned off
5/ # [ 6.310000] tv_sec:6 tv_usec:310037
6[ 6.310000] CPU0 kick watchdog!
7[ 11.310000] tv_sec:11 tv_usec:310036
What we learned so far is that there is a kernel watchdog preventing any shell from executing correctly. In fact, the entire router freezes with this, which seems clearly intentional.
Two things that are important to remember at this point in the story:
- The router is running firmware version 1.20.01, which I captured during the initial device fingerprinting.
- There was no easy way in, since this kernel watchdog could not be disabled via env vars.
I assumed defeat and decided to download the firmware from the vendor’s support page. When I got there7 (at the time
of investigation), the latest version was 1.20B01 HOTFIX, which naturally caught my eye, and I looked into its release
notes8. While on the surface it doesn’t look like much, it does say two things that I find really interesting:
- “Enhance security”
- “This firmware version cannot be downgraded to previous versions”.
Take this with a grain of salt, but I think this upgrade was meant to fix an impactful security vulnerability—and once upgraded, D-Link found a way to ensure devices are not rolled back to previous versions. Unsurprisingly, I found these known CVEs and security advisories:
- https://supportannouncement.us.dlink.com/security/publication.aspx?name=SAP10398
- https://www.sentinelone.com/vulnerability-database/cve-2024-6045/
The timeline seems to fit: CVEs disclosed in 2024, security notice in May, firmware update in June.
I felt this was a promising lead—maybe an older, pre-hotfix build would lack the watchdog hardening or carry a known weakness I could leverage. However, before trying any of that, I wanted to download the firmware and see what was in there, hoping it would be enough to get a firmware dump.
And that’s where this first post is going to stop. The firmware patch I downloaded did not contain the actual firmware, but does have a lot of shell scripts and other binaries loosely divided into different places. This means I essentially need to reverse how patches work in these devices, and find my way in.
One thing is clear, though: I can potentially patch one of these kernel files that are loaded into the device to either disable the watchdog or somehow generate a shell before proceeding.
 1dlink-ax1500/GPL » ls -l
 2total 176
 3-rw-r--r--. 1 deadbeef   996 Jan  5  2026 autoconf.h
 4drwxr-xr-x. 1 deadbeef   486 Jan  5  2026 backports-5.2.8-1
 5drwxr-xr-x. 1 deadbeef   746 Jan  5  2026 backports-5.2.8-1_1.2.3
 6drwxr-xr-x. 1 deadbeef   176 Jan  5  2026 ca_packages
 7drwxr-xr-x. 1 deadbeef   128 Jan  5  2026 ca_user
 8drwxr-xr-x. 1 deadbeef   672 Jan  5  2026 config
 9-rwxr-xr-x. 1 deadbeef  9131 Jan  5  2026 config.arch
10-rw-r--r--. 1 deadbeef  3646 Jan  5  2026 config.in
11-rw-r--r--. 1 deadbeef     2 Jan  5  2026 config.luna.hint.in
12drwxr-xr-x. 1 deadbeef  1142 Jan 20  2026 lib
13-rw-r--r--. 1 deadbeef 78710 Jan 20  2026 LICENSE.txt
14drwxr-xr-x. 1 deadbeef   596 Jan  5  2026 linux-4.4.x
15-rwxr-xr-x. 1 deadbeef 38385 Sep  2  2025 Makefile
16-rwxr-xr-x. 1 deadbeef 15797 Sep  2  2025 Makefile.image
17-rw-r--r--. 1 deadbeef  2128 Sep  2  2025 README
18drwxr-xr-x. 1 deadbeef   130 Jan  5  2026 romfs.bak
19drwxr-xr-x. 1 deadbeef   128 Jan  5  2026 rtk_voip
20-rwxr-xr-x. 1 deadbeef  8772 Jan  5  2026 squashfs-pf.list
21drwxr-xr-x. 1 deadbeef  1866 Jan 20  2026 tools
22drwxr-xr-x. 1 deadbeef    76 Jan  5  2026 user
23drwxr-xr-x. 1 deadbeef    80 Jan  5  2026 work
While I haven’t reached my goal, I have not given up yet. But that’s what security research is all about in the end— trying harder. And the purpose of writing this post is precisely to remind myself (and others out there) that it’s not all about popping shells and not everything is that easy.
What’s the plan to pwn the router then?
- Inspect these patches, understand if anything reveals how to disable the kernel watchdog.
- Try patching this patch to spin a shell on boot.
- Explore the CVE found earlier, see if that works here too.
- Write part 2 of this post.